Enable SSO using Azure Entra ID
Create a new App registration on Azure for SSO
-
Go to the Azure portal → Microsoft Entra ID.
-
Make sure you are in the correct subscription.
-
From Overview, expand Manage from the top navigation and click App registration.
-
Register a new application by clicking New Registration:
- For the name use Penfield SSO or anything else that follows your standard
- For Supported account types, choose "Accounts in any organizational directory (Any Microsoft Entra ID tenant - Multitenant) and personal Microsoft accounts (e.g. Skype, Xbox)"
- Under the Redirect URI (optional Select the Web application type using the dropdown menu
- Provide the Redirect URI:
https://<**FQDN for Penfield App**>/public/self-service/methods/oidc/callback/microsoft - Click Register.
For reference: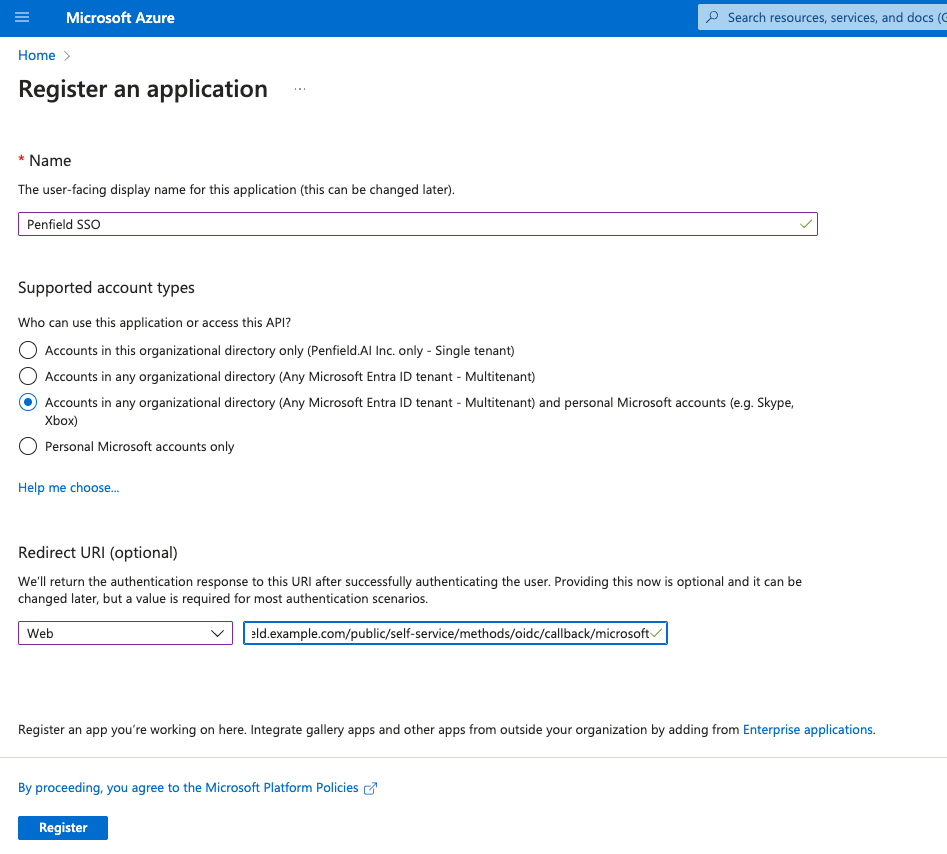
-
Go to Certificates & secrets and create a new client secret and copy the value of the client secret, you will need this value later on.
-
Go to App roles , Create multiple roles as below by clicking on Create app role and click Apply.
NOTE: Make sure the Value is in all lowercase.
Display names Allowed member types Value Description Admin Users/Groups admin Admin role for Penfield App Analyst Users/Groups analyst Analyst role for Penfield App Automation Users/Groups automation Automation role for Penfield App -
Go to Overview tab and copy the followings, you will need these later:
- Application (client) ID
- Directory (tenant) ID
Update the Enterprise application
- Under Microsoft Entra ID, Select Enterprise applications.
- Search using the Application name that you set up above.
- Select the application.
- Expand the Manage section and choose Properties
- Toggle the Assignment required? to Yes.
- Save the configuration.
- Go to Users and Groups and Click Add user/group
- Select the appropriate users or group (However you want to manage, Recommendation is manage using groups) and corresponding role that you want to assign. You may want to create User Group in advance if you want to leverage groups.
- Once selected click on Assign
- Repeat above two steps for assigning multiple users/groups to corresponding roles.
Update Penfield app configuration
-
Make sure you have these values:
- CLIENT_ID (Application ID)
- TENANT_ID (Directory ID)
- CLIENT_SECRET
-
Make sure you set the kubectl context to the right cluster. You can check the current context with
kubectl config current-contextand set the context withkubectl config use-context <context-name> -
Update the helm chart values.yaml file, Find the following block in kratos section and make sure the values are correct as below:
enable SSO# Enable OIDC only if you use SSO
oidc:
enabled: trueenable SSO## Enable below config if you enable SSO
deployment:
extraEnv:
- name: SELFSERVICE_METHODS_OIDC_CONFIG_PROVIDERS
valueFrom:
secretKeyRef:
name: penfield-secrets
key: oidcConfig -
Update the
penfield-secretswith the below values (replace the values with the ones from the previous step):You can either update using ArgoCD config or kubectl directly patching the secret.
-
Update using ArgoCD config: Added the below values to the existing
penfield-secretssecret, You may need to encrypt the secret before updating if you are using secret manager.update penfield-secretsdata:
oidcConfig: [{"id": "microsoft","provider": "microsoft","client_id": "<Update_client_id_value>","client_secret": "<Update_client_secret_value>","microsoft_tenant": "<Update_microsoft_tenant_value>","mapper_url": "base64://bG9jYWwgY2xhaW1zID0gc3RkLmV4dFZhcignY2xhaW1zJyk7CnsKICBpZGVudGl0eTogewogICAgdHJhaXRzOiB7CiAgICAgIFtpZiAnZW1haWwnIGluIGNsYWltcyB0aGVuICdlbWFpbCcgZWxzZSBudWxsXTogY2xhaW1zLmVtYWlsLAogICAgfSwKICB9LAp9Cg==","scope": ["email","profile"]}] -
Update using kubectl:
update penfield-secrets# Set your environment variables, use the values from the previous step
export CLIENT_ID="replace-with-your-client-id"
export CLIENT_SECRET="replace-with-your-client-secret"
export TENANT_ID="replace-with-your-tenant-id"
# Patch the secret, run this command in your terminal
kubectl patch secret penfield-secrets -n penfield-app -p='{"stringData":{"oidcConfig": "[{\"id\": \"microsoft\",\"provider\": \"microsoft\",\"client_id\": \"'"$CLIENT_ID"'\",\"client_secret\": \"'"$CLIENT_SECRET"'\",\"microsoft_tenant\": \"'"$TENANT_ID"'\",\"mapper_url\": \"base64://bG9jYWwgY2xhaW1zID0gc3RkLmV4dFZhcignY2xhaW1zJyk7CnsKICBpZGVudGl0eTogewogICAgdHJhaXRzOiB7CiAgICAgIFtpZiAnZW1haWwnIGluIGNsYWltcyB0aGVuICdlbWFpbCcgZWxzZSBudWxsXTogY2xhaW1zLmVtYWlsLAogICAgfSwKICAgIG1ldGFkYXRhX3B1YmxpYzogewogICAgICBbaWYgJ3JvbGUnIGluIGNsYWltcyB0aGVuICdyb2xlJyBlbHNlIG51bGxdOiBjbGFpbXMucm9sZSwKICAgICAgW2lmICdncm91cHMnIGluIGNsYWltcyB0aGVuICdyb2xlJyBlbHNlIG51bGxdOiBjbGFpbXMucm9sZSwKICAgICAgJ2NsYWltcyc6IGNsYWltcywKICAgIH0sCiAgfSwKfQ==\",\"scope\": [\"email\",\"profile\"]}]"}}'
-
-
Update the deployment:
If you are using ArgoCD, you can update the deployment by merging the changes to your version control.
If you are using helm, you can update the deployment by running the following command:
helm upgrade \
   --install penfield-app penfieldai/penfieldai \
   --namespace penfield-app \
   --values penfield-values.yaml